
- 1 cup sugar
- 2/3 cup light corn syrup
- 1/3 cup shortening of your choice
- 1 tsp vanilla extract
- 3 cups powdered sugar
- 1/4 tsp salt
- several drops red and yellow liquid food coloring
do you love candy corn? well today’s post is from my friend suzie. suzie is the co-founder of foodallergyny.com, a support group for food allergic families in the ny metro/westchester area. suzie is also a freelance writer and allergen + gluten-free kitchen magician (as you will see below).
before suzie and i met i had heard a lot about her situation. i will admit, i don’t know much about allergies because my kids don’t have any. during a brief conversation at the pool this summer i learned that suzie makes her own candy corn because her children can’t eat a lot of the halloween candy out there. i asked her if she would be interested in writing a guest post. i bet there is a lot of parents out there who understand, and what better way to celebrate halloween then making your own candy corn!
• • •
did you know twizzlers contain wheat? how about peppermint patties and candy corn?, they often contain eggs. and of course…chocolate bars, most contain milk or nuts…
both of my sons are allergic to eggs. in our house making candy corn has become as big a part of our yearly halloween ritual. a passionate candy-corn eater myself, i was delighted to find the homemade version. making candy corn turns out to be a fantastic hands-on activity for children (of course with the help of an adult), as rolling it out is just like playing with clay—only the end results are edible (and did i mention delicious?)
this recipe yields a very big batch; unless your kids have good attention span (yeah right), you have a lot of helpers, or you basically just don’t mind staying up late and rolling by yourself, i suggest halving this or freezing the extra dough to be rolled out at a later date.
making candy corn is a time-consuming process, but the results, and the resultant memories, are worth it. i even found my children rationed (and savored) their candy-corn eating on their own once they saw how much time it took to form each piece.
there is also a great website, allergyfreehalloween.com, that publishes a list of candies which are free of the ‘top 8’ most common allergens (wheat/egg/milk/tree nuts/peanuts/soy/shellfish/fish) as well as offers free, über-stylish, downloadable window signs that let families know you have safe candy for even (most) allergic children.
some top choices for allergy-‘free’ candies for your trick-or-treaters this year? skittles, smarties, dum dums, sour patch kids, pez, swedish fish or any yummy earth candy, just off the top of my head. because as the website says, “halloween is scary enough without food allergies.”
have a sweet and safe halloween!
Homemade Candy Corn
Suggested tools
- food grade rubber or latex-free gloves
- candy thermomete
- 3 non-stainable heat resistant bowls
in a large saucepan, combine sugar, corn syrup and shortening. cook over high heat, stirring often, until it reaches the soft ball stage on a candy thermometer (230f), turn off heat. remove mixture from burner and add vanilla.
in a separate bowl, combine the powdered sugar and salt. add this mixture to the saucepan, mixing thoroughly. allow the dough to sit until it’s cool enough to handle.
divide the dough into 3 equal parts and place each part in a small, heatproof, color-resistant bowl. you will have to wait until the dough is cool enough to knead in order to fully mix the food coloring in. i often place the bowls into the freezer for a few minutes to speed the process as they are VERY hot in the middle and may remain so for a long while.
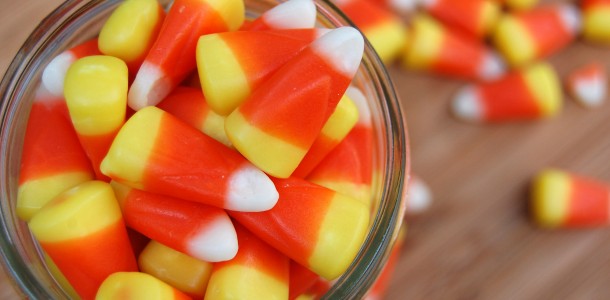
once they are cool enough to work with, the three doughs will become the 3 different colors of the candy corn stripes:
bowl 1: white. leave this white for the tips of the candy corn.
bowl 2: yellow (it is important to start with yellow candy corn THEN move on to orange unless you are going to change your gloves in between, you will stain the yellow ball red/orange!). add a few drops, 4 or so to start, of yellow food coloring—this is an excellent thing for your children to help with safely. then, wearing latex-free gloves to protect your hands from becoming stained, an adult (remember, it needs to be still somewhat warm to retain its pliancy) knead the dough until smooth/the ingredients are well-mixed and the color is evenly mixed throughout. add additional drops of coloring and continue to knead if a darker yellow is desired.
bowl 3: orange. add equal number drops of yellow and red food coloring, starting with 4 or so of each. again, knead the dough until smooth/well-mixed for ingredients and color and the color is to your liking. if a darker/richer color is desired, add more yellow and red drops.
being careful not to discolor the different doughs (i.e. either remove, wash or change stained gloves), pinch off small balls from each bowl. gently roll each different color into as long a 1/2 inch diameter rope as you can without breaking it. if it does crack and break, gently squeeze the rope back together. if it consistently cracks and breaks/won’t stay together, pop it on a microwaveable plate and into the microwave for about 5-10 seconds to rewarm/make it more pliable (but be careful if giving it back to a child as the microwave may make it too hot for them to handle). once the three different colored ropes are made, line them up on a cutting board or a counter on which you can cut, one under another, with orange in the middle. (yellow and white don’t matter whether they’re on the top or the bottom, you’ll see why in a moment).
carefully press the 3 ropes together to make a long, narrow rectangle. the better the colored ropes stay together, the better your individual candy corn pieces will stay together. a gentle, light rolling with a rolling pin along the length of the rectangle helps seal the different colors together, but be careful not to flatten the dough too much as you’ll want the final kernels to be plump (and not flat).
finally, take a knife and cut the dough diagonally back and forth into triangles or “kernels”—i.e.each cut will angle in a different direction, meaning the first kernel will have a traditional white tip and yellow top, then the next will have a white top and yellow tip, etc. etc. i’ve found my children want to and can even do the cutting with a plastic or metal butter knife. Once the rope is all cut, gently shape the kernels with your fingers to ensure the colors all stick together and the kernels have a nice final shape after the cutting. taste some, of course, but then allow the majority of the kernels to sit for a while to become firm while you repeat above steps (and repeat!).
if you cannot finish in one sitting, place any remaining dough in plastic bags and leave on the counter or put in the freezer. store the finished candy corn in sealed containers or put on a tray and freeze. once frozen, put into a bag or container for long-term storage in the freezer.


